Connect to Database
To create GeoJSON services from database tables
In Mapia’s Geoportal, database connections are mainly used for:
- Data Visualization: Data is displayed in the Geoportal as a normal vector layer.
- Data Editing: The Geoportal allows editing the data of a layer created from a database connection.
- Create GeoJSON Layers: We can create new GeoJSON layers using the public URL generated by the DatabaseLayer.
Information
Layers created from table connections to the database are named: DATABASE LAYERS.

The procedure to create these types of layers is as follows:
- Create the database connection from: Home › General Settings › Database Connections.
- Create a new layer from a table from: Home › Layer Manager › DataBaseLayers.
- Configure the new layer with the corresponding properties.
Database Connection
To establish the connection, go to Home › General Settings › Database Connections and define a new connection with the following values:

- Alias: Specify an alias or a name known by the database users to correctly identify it.
- Engine: The database engine to which we want to connect, usually PostGIS.
- Database Name: Name of the database.
- User: Database user for the connection.
- Password: Database password.
- Host: Database server.
- Port: Connection port.
Create New Layer
Create a new layer from Home › Layer Manager › DataBaseLayers. Before that, we must specify the following values:

- Database Connection: Choose the database connection. If there is already a previous connection, select the desired one. If there is no previous connection, connect to a new one as explained in the previous section.
- Geometry Columns: Select the name of the geometry field from the table we want to connect. It only accepts tables that contain geometries.
- Name: Internal name of the layer in the Geoportal.
- Table: Name of the table in the database. It only accepts tables that contain geometries.
- Geometry Field: Name of the geometry field containing spatial information.
- SRID: Coordinate system with EPSG format (e.g., 25831 for ETRS89 or 4326 for WGS84).
- Primary Key: Primary key of the table. It is mandatory; if the table does not have one, it must be created.
- Apply Data Filters: Allows filtering incoming data based on field values. We have fields and values with JSON notation. It accepts the same filters as the public URLs of the databaselayers (filter information).
{
    "CampoA": "carrer",
    "CampoB__isnull": true,
    "nom camp__filtro": "valor"
}
Configurations
Once the layer is created, we need to configure all the options as with the rest of the layers in the Geoportal:

- Check all the general properties at Information, Layer Properties.
Some concepts:
- Fields: These are all the fields of the connected table. They mainly allow us to modify the display names and determine which fields should appear and which should not. They also allow defining editing options, such as which fields can accept blank values, what type of control the editing form will present, etc.
- Widgets: They allow configuring specific editing options for each field, check the technical information.
- Virtual Fields: Allow two types of operations with fields in edit mode:
- Linked field: Modify or display the name of a field that depends on another. For example, the description of a set of codes (value and domain).
- One-to-many relationship: Allows choosing the value of a field from another table.
- References: Allow defining one or more background WMS that will be activated when editing the layer. By default, we use the already explained options of external layers through Datasets.
Data Editing
All DatabaseLayers can be edited from the Geoportal if the user has the corresponding permissions. Check the following page for all the information:
Data Editing from the Geoportal

Refresh DataBaseLayer
If once we have created the DataBaseLayer, it needs to be updated due to changes in the database table, you only need to:
- Open the DataBaseLayer from the application
- Save the layer again from the application
Upon saving, all changes made to the original table will be updated.
Filtering in GeoJSON Layers
Once we have the connection established and the DatabaseLayer created, we can use the public URL of the new layer to create other GeoJSON layers filtered as needed.
Let’s consider a table with 3 fields:
| id | code | Description | Type |
|---|---|---|---|
| 1 | VEG | Arbre | Palmera |
| 2 | VEG | Arbre | Plataner |
| 3 | ENE | Fanal | E-256 |
| 4 | ENE | Fanal | E-256 |
| 5 | MOB | Banc |
In this case, we could have a DatabaseLayer created from the database table that is not visible in the Geoportal and 3 GeoJSON layers created with the following URLs:
- https://geoportal.xxxxx.cat/apps/giscube-admin/layerserver/databaselayers/xxxxxx/data/?code=VEG
- https://geoportal.xxxxx.cat/apps/giscube-admin/layerserver/databaselayers/xxxxxx/data/?code=ENE
- https://geoportal.xxxxx.cat/apps/giscube-admin/layerserver/databaselayers/xxxxxx/data/?code=MOB
We can obtain the public URL of each DatabaseLayer from the main layers list:
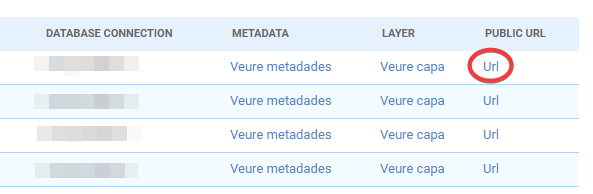
Check all the available information (options and filters) about the public URLs of the DatabaseLayers on the page: API Databaselayer